Use HubSpot to create leads and contacts
Available on: Professional, Business plans
HubSpot is an inbound marketing and sales product that helps companies attract visitors, convert leads, and close customers. HubSpot offers a full stack of software for marketing, sales, and customer service, with a completely free CRM at its core.
When you connect your form to HubSpot, each submission will create a new contact in your CRM. Also, you’ll be able to set the Lead Status and Life Cycle Stage.
Form Setup
Before using the HubSpot plugin you must create a form to collect new submissions. Any HTML form will work. Additionally, you can use the following special named inputs.
name=“email” (Required)
Adding an input named “email”, the contact will be created on your HubSpot account. If you already have a contact registered with this email, its info will be updated.
<input name="email" type="email" required/>name=“name”
Adding an input named “name” or using “firstName” and “lastName” inputs will set the contact’s name.
<input type="text" name="firstName" placeholder="Your first name">
<input type="text" name="lastName" placeholder="Your last name">
or
<input type="text" name="name" placeholder="Your full name">name=“phone”
Set contact’s phone. Not required.
<input type="tel" name="phone" placeholder="Phone">name=“website”
Set contact’s website. Not required.
<input type="url" name="website" placeholder="https://example.com">name=“company”
Set contacts company. It will create a new company if not exists and bind to your contact. Not required.
<input type="text" name="company">name=“address”
Set contact’s address information. Not required.
<input type="text" name="address">name=“city”
Set contacts city address. Not required.
<input type="text" name="city">name=“state”
Set contacts state address. Not required.
<input type="text" name="state">name=“zip”
Set contact’s zip. Not required.
<input type="text" name="zip">Additional Form Fields
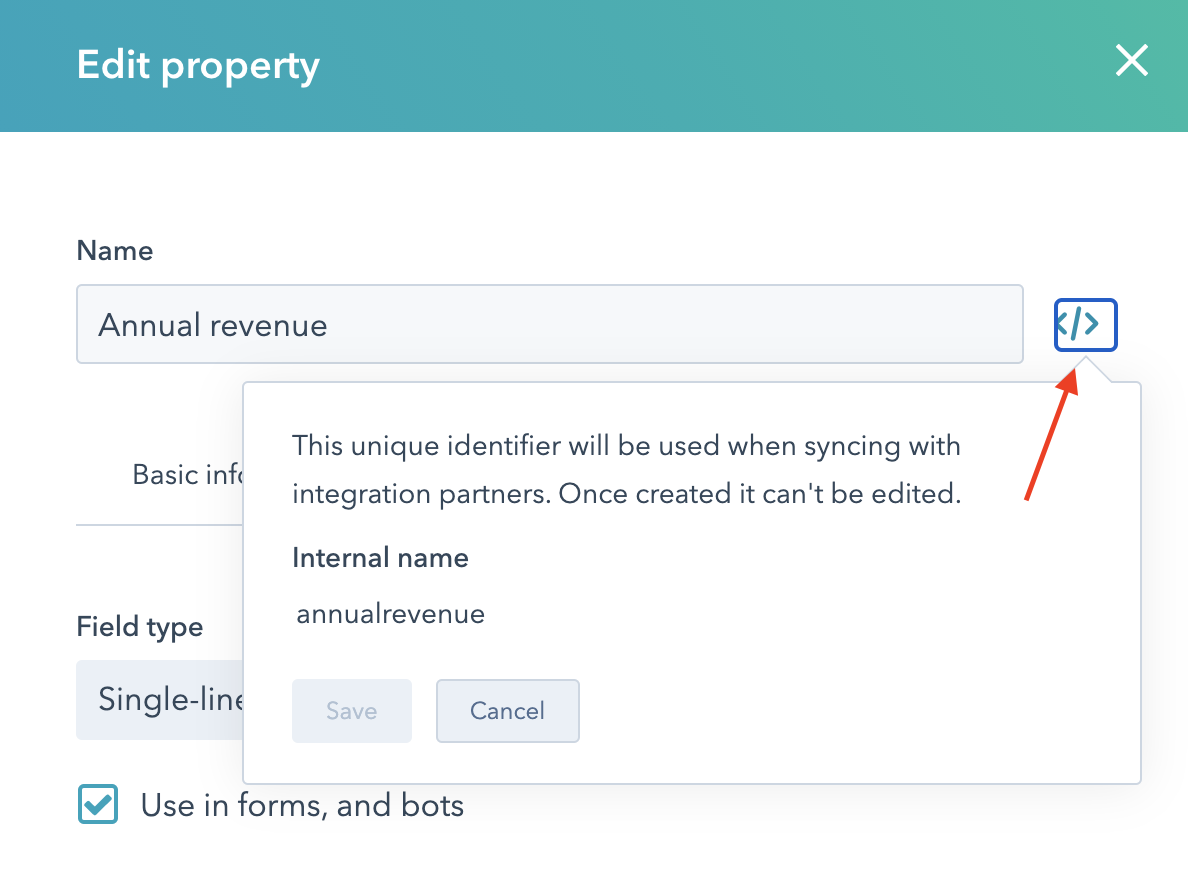
Additional Hubspot form fields will be mapped automatically if the field name matches Hubspot’s internal property name. For instance, Hubspot has a field labeled “Annual Revenue”, but the internal property name is “annualrevenue”. Formspree will also only match properties that are writeable. Many properties can only be set by Hubspot, so if a property is read-only, Formspree will ignore it.
The Hubspot documentation includes more details on how to view your current properties and create your own custom properties. To view the internal property name, you should view the property’s details and click on the </> icon to view the internal property name.
Once you submit your form, Formspree will try to match all writeable properties to your form fields. If a property is invalid, Formspree will not include the property when sending to Hubspot. A property can be invalid for a number of reasons:
- If the property is a numerical type, and an invalid number is sent, Formspree will not send the property
- If the property is an enumeration type, Formspree will ensure that the value sent is one of the valid options. If the property is a multiple select enumeration type, the property will only be sent if ALL options sent are valid enumeration types
- If the property is a date type, Formspree will attempt to parse the date and only send the date if the date can be parsed. To guarantee that a date is parsed, ensure that the date is sent in the format YYYY-MM-DD.
- If the property is read-only, Formspree will not attempt to send it.
Connecting to HubSpot
Note: If you’re using the Formspree CLI please instead refer to our article Create leads and contacts in Hubspot to connect to HubSpot.
Once you’ve created and configured a form that has an input named “email”, you can connect to HubSpot using the HubSpot Plugin.
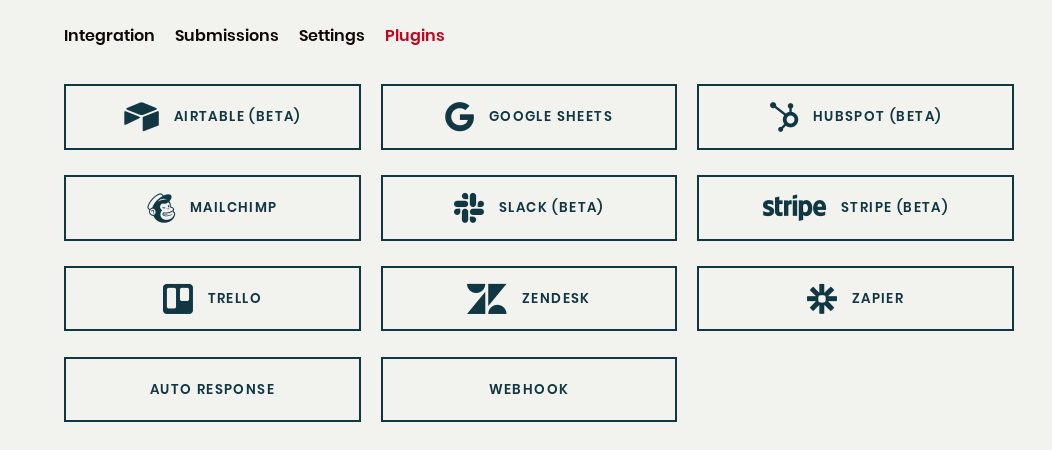
From the plugins tab of your form, click the HubSpot Plugin button.
Then click connect.
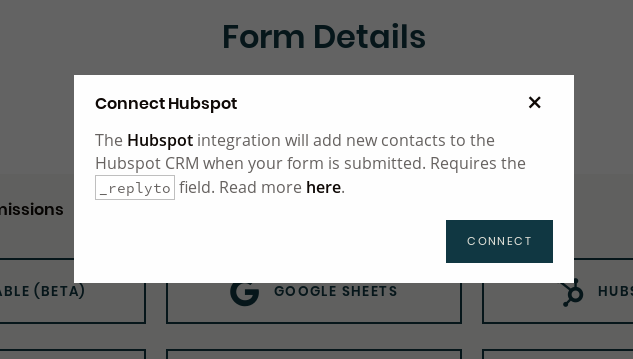
You’ll be redirected to sign in using your HubSpot login. Once you’ve signed in, choose which account you want to connect for this selected form. You’ll be requested for integration permissions about user and account information and read/write to your Contacts. Grant this access.
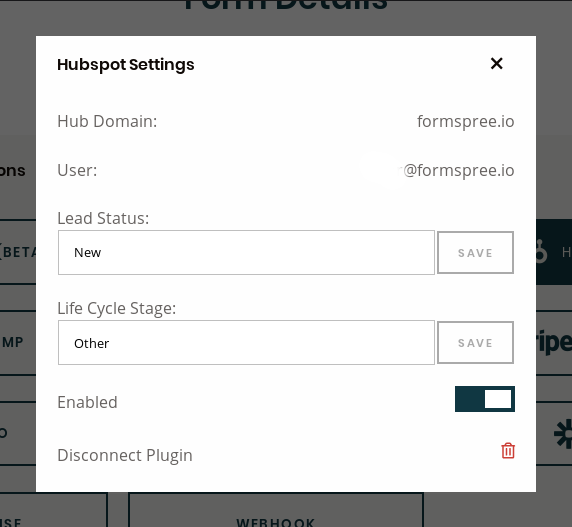
After that, you’ll be prompted to configure Hubspot settings.
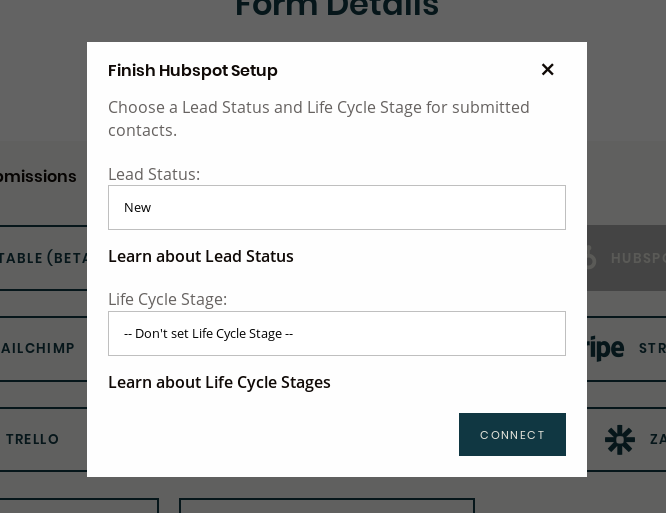
As default, your contacts will be created with Lead Status New and Life Cycle Stage None.
Lead Status Options
New: These are leads you have not yet reached out to.
Open: These are leads that have expressed interest in buying your product or service but you have not made contact yet.
In Progress: These are leads that negotiations are already in progress.
Open Deal: These are leads that have expressed interest in buying your product or service. You’ve already opened a deal with them.
Attempted to Contact: These are leads you have tried to reach out to but haven’t been able to successfully connect with yet.
Connected: These are leads with whom you’ve made the first contact but you’ve not opened a deal with them.
Life Cycle Stages Options
Subscriber: Contacts who know of your business and have opted in to hear more from your team. These are likely visitors that have signed up for your blog or newsletter.
Lead: Contacts who know of your business and have opted in to hear more from your team. These are likely visitors that have signed up for your blog or newsletter.
Marketing Qualified Lead: Contacts who have engaged with the team’s marketing efforts, but are still not ready to receive a sales call. An example of an MQL is a contact who responded to a specific form in a marketing campaign.
Sales Qualified Lead: Contacts who have indicated through their actions that they are ready for a direct sales follow-up. An example of an SQL is a contact who submitted a question about your product through a contact form.
Opportunity: Contacts who are real sales opportunities.
Customer: Contacts with closed deals.
Other: A wildcard stage that can be used when a contact does not fit any of the above stages.
To know more about the differences between Lead Status and Life Cycle Stage read this HubSpot Article.
To finish HubSpot setup select which stage and status fit better with your case and click connect to enable HubSpot plugin.
In the future, if you’d like to change the lead status/life cycle stage or disable the plugin entirely, you can do so by clicking on the HubSpot button again to adjust its settings.
You may also need to toggle off “Set lifecycle stage when a contact or company is created”
